Create an OAuth2 application in XFA
An OAuth2 application in XFA adds device verification to an OAuth2 sign-in flow. XFA sits between your application and identity provider, verifies the device during login, and forwards the user only when your policy decision allows access. Use it to enter the right values and test the sign-in flow.
How it works
Once configured, when a user signs in to an application using OAuth2:
- Application → Identity Provider: The application redirects the user to your identity provider (e.g. Google Workspace, Okta) to authenticate. Because the
redirect_urihas been set to XFA's endpoint (see step 4 below), the identity provider will return the user to XFA after authentication. - Identity Provider → XFA: After authentication, the identity provider redirects the user back to XFA's redirect URL along with the authorization code.
- XFA verifies the device: XFA checks the security posture of the device against your policy. If the device does not meet your policy, access is denied.
- Token exchange, Application → XFA → Identity Provider: If the device passes, XFA redirects the user back to the application with the authorization code. The application then exchanges the code for an access token by calling XFA's token endpoint; XFA transparently proxies this request to your identity provider's token endpoint. XFA uses this exchange to link the authenticated user to their device. The token returned to the application is unchanged: XFA does not modify it.
What to configure where
| Where | What to configure |
|---|---|
| Application (OAuth2 settings) | Replace the redirect_uri with the XFA Redirect URL |
| XFA | Integration Name, your application's original Redirect URL, and the Identity Provider's Token Endpoint |
Note: This article assumes that you have an account set up with XFA for your organization and you are an admin for that organization. If you do not have an account, you can create one at https://dashboard.xfa.tech/signup.
1. Login to the XFA dashboard
2. Create a new application under Enforcement > New > OAuth2 Integration

3. Fill in the OAuth2 settings
Integration Name: A descriptive name for this integration
Redirect URL: The original redirect URL of your application, where XFA will forward the user after device verification
Token Endpoint: The OAuth2 token endpoint of your identity provider, which XFA uses to exchange the authorization code for an access token (e.g. https://accounts.google.com/o/oauth2/token for Google Workspace, or https://<your-domain>/oauth2/v1/token for Okta)
Click Save to save your integration.
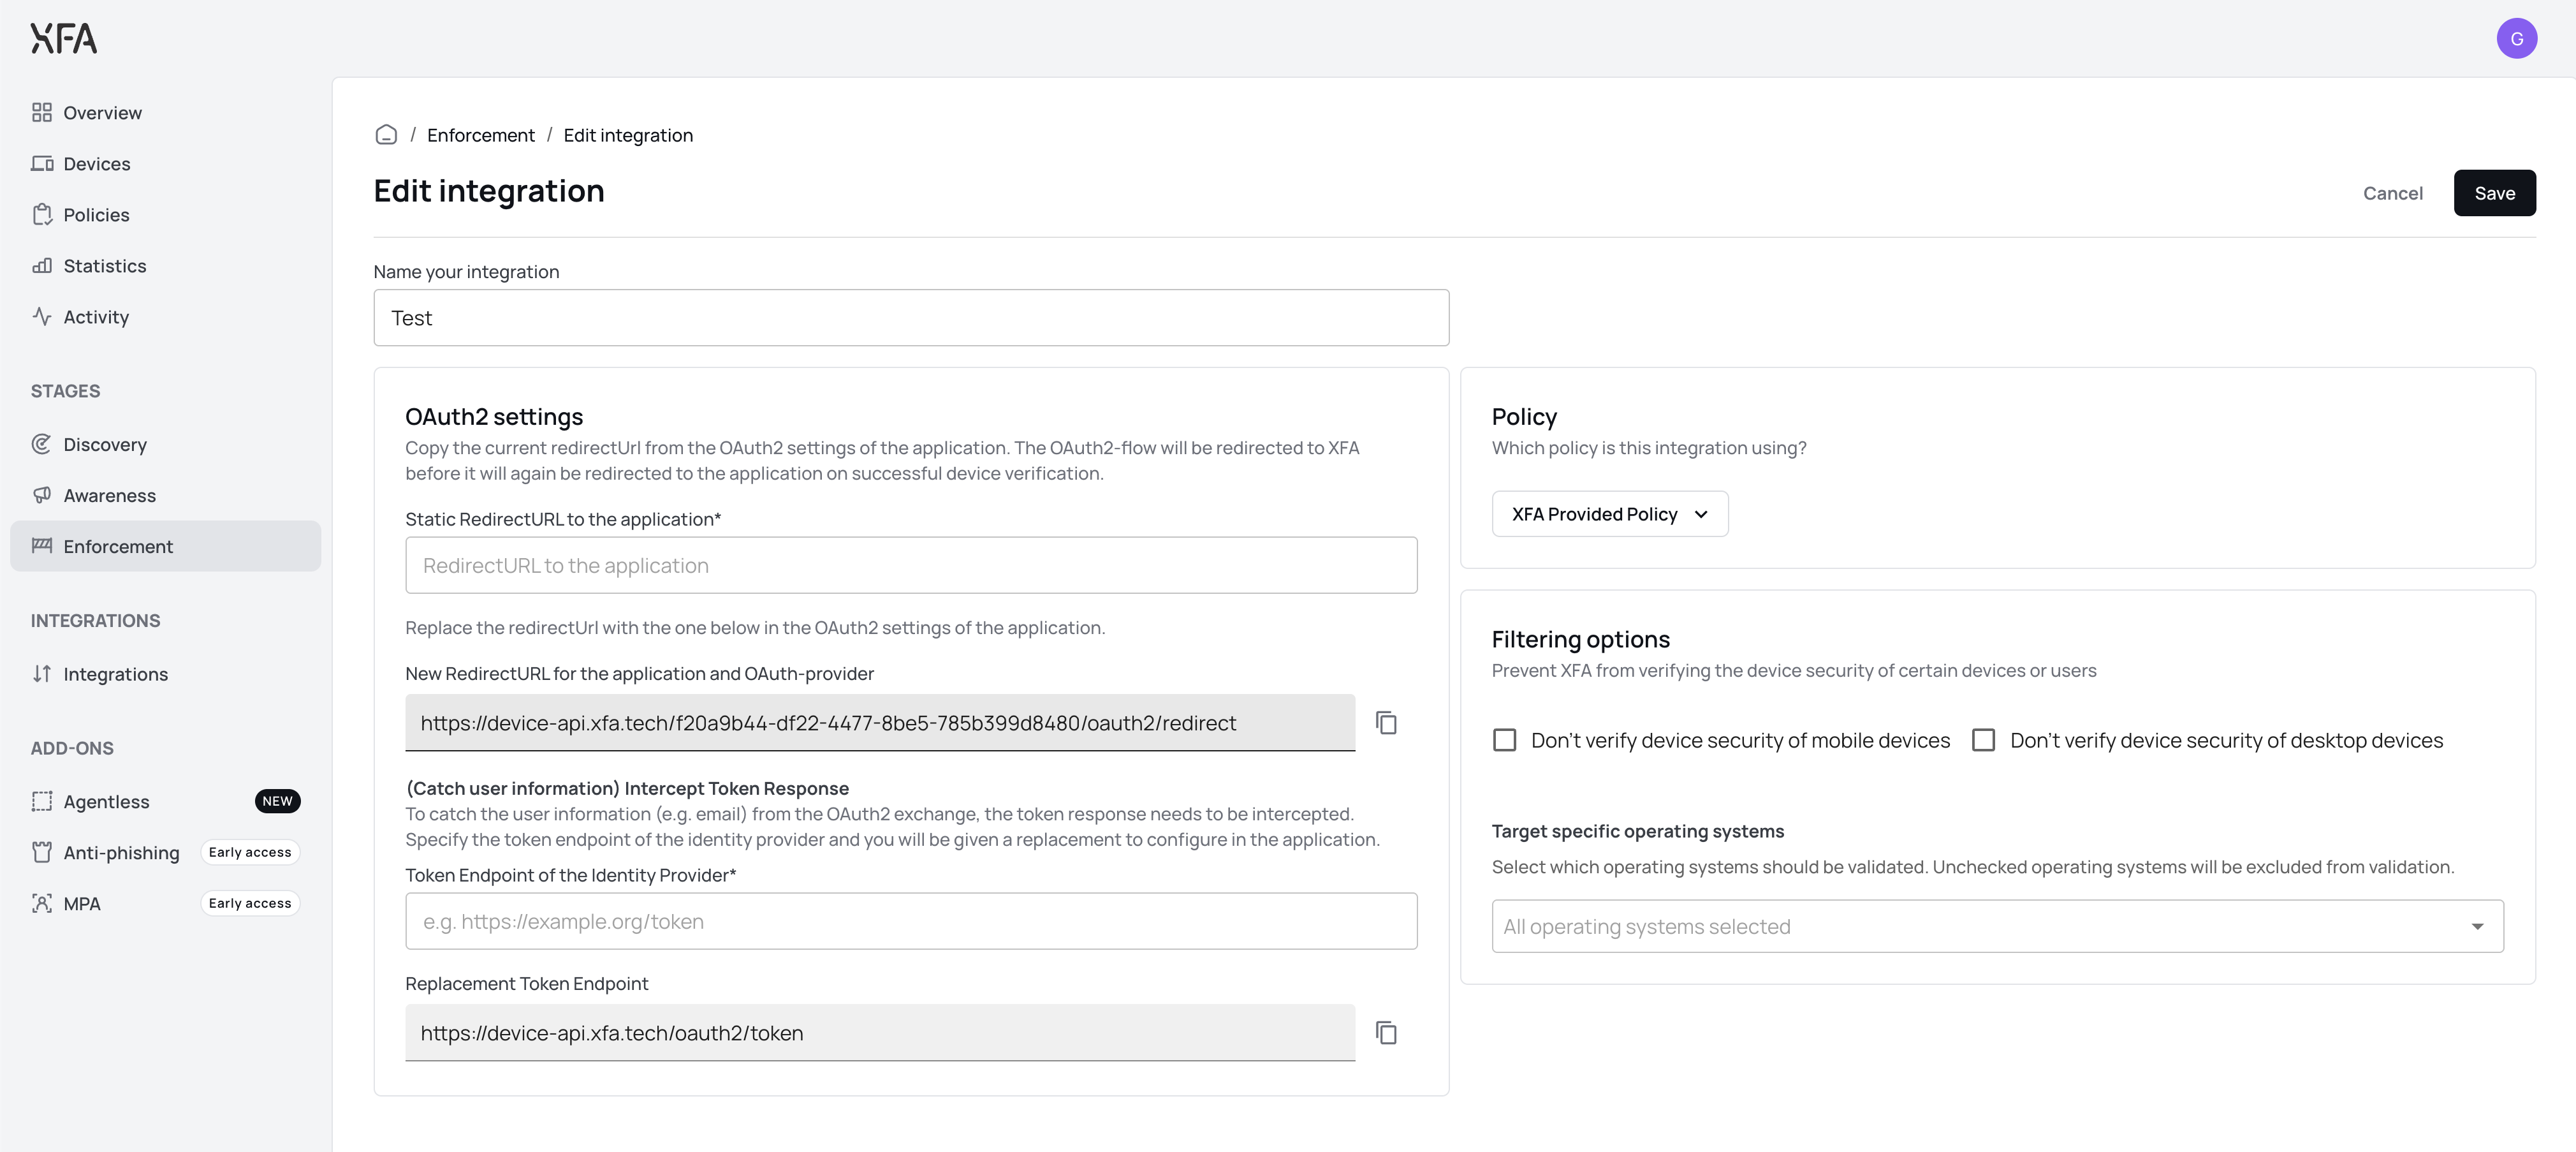
4. Update your application's OAuth2 settings
After saving, copy the XFA Redirect URL shown in the integration details. In your application's OAuth2 configuration, replace the existing redirect_uri with this XFA Redirect URL. This ensures that after authentication, the identity provider returns the user to XFA for device verification instead of directly to the application.
5. Test the connection
Test the login flow by signing in through the application. The browser should be redirected to your identity provider to authenticate, then to XFA for device verification, before being forwarded back to the application.
Run the device check before authorize (for short-lived authorization codes)
By default, XFA runs its device check after the identity provider returns the authorization code, just before exchanging that code at the Token Endpoint (see How it works above). Some identity providers issue authorization codes that expire very quickly. If the device check takes longer than the code stays valid, for example when the user still needs to install the XFA agent, the token exchange can fail with an invalid_grant error and the user sees an authentication failure. With Microsoft's OpenID Connect handler the same situation can surface as an IDX21106 "Failed to parse token response body as JSON" error.
For these providers, XFA can instead run the device check before it redirects the user to the identity provider. The provider's authorization code is then only minted once the check has passed, so it is redeemed within seconds and stays well inside its lifetime.
This option is opt-in and applies only to the OAuth2 proxy integration described on this page. If you leave the new field empty, XFA keeps the default behaviour (device check after the code is returned).
Enable device check before authorize
-
In your OAuth2 integration in the XFA dashboard, set the new Authorize Endpoint of Provider field to your identity provider's OAuth2/OIDC authorization endpoint. This is the same authorize URL your application points at today, for example
https://<your-domain>/oauth2/v1/authorize. -
In your application's OAuth2 configuration, change the authorization URL (AuthUrl) so that it points at XFA's authorize entry point instead of at the identity provider directly:
https://device-api.xfa.tech/<applicationId>/oauth2/authorizeReplace
<applicationId>with your XFA application ID. -
In your application's OAuth2 configuration, set the
redirect_uriback to your application's own redirect URL. It has to match the Redirect URL you entered in XFA exactly. -
At your identity provider, keep the XFA Redirect URL in the allowed redirect URIs of your client. XFA sends it to the identity provider in place of your application's own redirect URL.
Your client ID and client secret, and the Token Endpoint in XFA are unchanged.
If your application already sends the XFA Redirect URL as its redirect_uri in this flow, it keeps working. We recommend switching to your application's own redirect URL.
XFA: set Authorize Endpoint of Provider to the provider's authorize URL
Application: point AuthUrl at https://device-api.xfa.tech/<applicationId>/oauth2/authorize, and send your application's own redirect URL as redirect_uri
Identity provider: allow the XFA Redirect URL as a redirect URI
Unchanged: client ID, client secret, and Token Endpoint
Roll back
To return to the default behaviour, point your application's AuthUrl back at the identity provider's authorization endpoint. Also set your application's redirect_uri to the XFA Redirect URL again, as in the default flow. Leaving the Authorize Endpoint of Provider field empty in XFA restores the device-check-after-authorize flow.